|
Along with continuing to work on the grid self portraits, this week we listened to music and responded to it in our sketchbooks. Drawn responses are open-ended. You may draw an abstract pattern that represents the rhythm or feeling of the song, or you may choose to draw a specific scene as an illustration of the song. Here are the songs I played, with a slightly different combination of 3-5 songs in each class:
1. Viva La Vida by Coldplay 2. Chasing Cars by Snow Patrol 3. In The Hall of the Mountain King by Grieg 4. Tightrope by Janelle Monae feat. Big Boi 5. Scat by Ella Fitzgerald and Mel Torme 6. 19-2000 by Gorillaz
0 Comments
This week, we continued working on the grid method self portrait drawings. They are coming along very nicely! There's a great variety in styles across all classes, and many people are starting to add creative elements to their portraits. Don't forget to do it in this order:
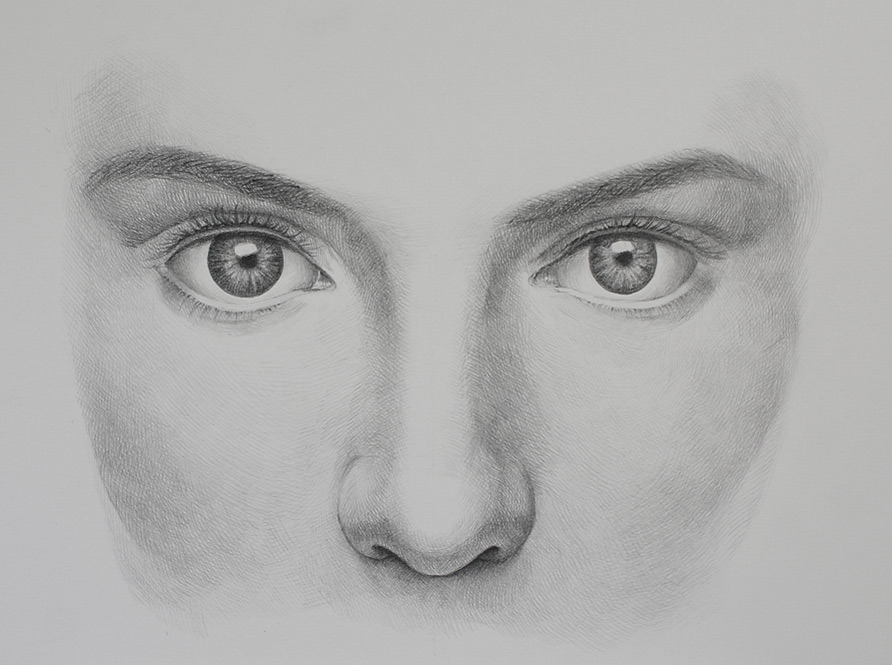
1. Complete, label, and double-check your grids on the photograph (1/2") as well as the drawing paper (1"). 2. Using a light pencil pressure, copy what you see and enlarge it, square by square. You are lightly outlining the shapes created by shadows and highlights. You may ignore the background. 3. After everything has been plotted, begin filling in with shading. You may choose to use hatching, cross-hatching, stippling, scribbling, blending, or something else creative like text. 4. While adding shading, begin making whichever creative alterations you would like to make. Remember the examples we saw in class for inspiration! We also practiced drawing the facial features by watching tutorials. There should now be a page in your sketchbook for each of the following: EYES (also see this, and this), NOSES, MOUTHS, and EARS. Sketchbook checks were moved to the next grading cycle. Report cards went home. Some classes completed the first few assignments on separate paper instead of in the sketchbook. If your class as a whole skipped one of the assignments, you are not responsible for completing it. Please make a note of that at the bottom of the sketchbook check list.
Complete list:
The week of February 8-12, we drew the proportions of the human face in our sketchbooks following my step-by-step method. We studied how to draw noses, mouths, and ears.
Friday this week is an art analysis and sketchbook catch-up day. We began our self portraits. Here are the steps: (PROTIP: Always draw lightly using a soft pressure on the paper. If you need to adjust something, it will be easier to erase without showing a ghost mark.) 1. Trace the square template onto your project board. 2. Using the ruler, measure the square to be sure it's 10"x10". 3. Make marks at every inch along each side. 4. Connect the marks you made. Be sure to line the ruler up with both marks before making the line. 5. Double check that your lines are straight and that you have 10 squares across by 10 squares down creating a complete grid. 6. Follow the same process to draw a grid on top of your printed photograph. The only difference is you will make marks at every half-inch (1/2") instead of every inch. This way, you will have a half-sized grid that's still 10 squares by 10 squares. 7. Label both grids with numbers across the top between the lines and letters down the size between the lines. This way, your squares are lettered and numbered. You can find the square for E4, for example. 8. Be sure your name is written in the top left corner and class period in the top right corner of both your photo and your drawing. 9. Start plotting the points and connecting them. DO NOT SHADE IN ANY VALUES YET. Just outline the shapes you see that make up the shadows and highlights. There are 10 levels of shades. 10. Start thinking about what kinds of alterations you would like to make to your drawing. We've been looking at a lot of creative examples of portraits that are based in reality but transformed in many ways. What will you do to make yours finished? What method of value will you apply? Brainstorm on your own. HOMEWORK: Finish anything in your sketchbook you weren't finished with yet. The week of February 1-5, we studied examples of artworks that incorporated the various methods of adding value, also known as shading. Then we did abstract sketchbook drawings using those same value methods (blending, hatching, cross hatching, stippling, and scribbling).
We studied and practiced drawing a wide variety of implied textures and began applying them to 3D forms. Friday, we looked at a few portraits and practiced going through the steps of art analysis. We wrote about the works we saw, starting with a first reaction and description, followed by a closer viewing of the elements of art and how they were used. Then we wrote about and discussed the mood, overall tone, or message the artist seemed to be expressing, whether purposeful or otherwise. This week we practiced drawing using the grid method, a technique for transcribing an image from one page to another by breaking it down to individual squares on a grid. This is drastically different from the technique we practiced last week using contour lines, continuous contour, blind contour, and even non-dominant hand drawings. In your sketchbook after those drawings, you should now have taped in the cat, bird, and face grid drawings.
We began practicing applying value (shading) on two worksheets also taped into your sketchbook. After taking pictures in class or submitting them to me via e-mail, we will begin our self portrait drawings soon, our first major grade of the semester. Until then, we are preparing by practicing grid method drawing, value, texture, and studying other portrait artists. We will look at examples of expressive and purposeful use of the elements of art (line, shape, value, form, color, texture, and space) in portraiture and plan how to apply them to our self portraits. Step-by-step guide for the grid method: http://www.art-is-fun.com/grid-method/ |
AuthorMs. Slavin Archives
May 2016
posts |
 RSS Feed
